 Skip to content


· By The Wakaii Team
Plushie Rescue: Your Guide to Toy Repair
We all know that children form deep emotional connections with their stuffed toys.
They're not just toys, but friends, confidants, and sources of comfort.
So when these cherished companions suffer a tear or lose an eye, it's not just a simple fix—it's a rescue mission.
But don't worry, you don't need to be a professional seamstress to mend these wounds.
With a few basic tools and a bit of patience, you can bring your child's favorite stuffed animal back to life.
Table of Contents [show]
Understanding Plushies
Before we dive into the repair process, let's take a moment to understand what makes up a stuffed toy.
These cuddly creatures are typically made from fabric and filled with materials like poly-fill or foam.
However, be aware that older toys might contain toxic foams or plastics.
These materials can potentially pose health risks, especially if they're ingested or inhaled, which can happen if the toy is torn and the stuffing is exposed. In some cases, these materials can also degrade over time and cause further damage to the toy.
If you find that your toy contains such materials, don't worry! You can replace the old stuffing with new, safe materials like poly-fill. (more on that later in the 'Restoring Plumpness' section)

Common Problems
Stuffed toys, like any well-loved item, can suffer from a variety of issues.
Parts like ears, noses, eyes, and limbs can become detached.
Seams can open up, revealing the stuffing inside.
Sound boxes can fail, leaving your toy eerily silent.
And over time, old stuffed toys can lose their plumpness, becoming flat and less cuddly.

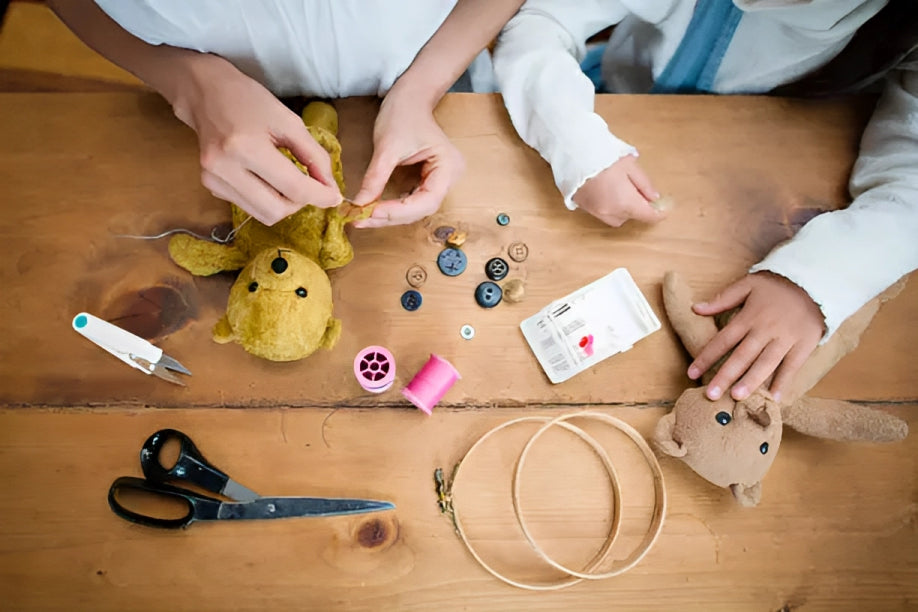
Basic Tools and Materials
Before you start your repair mission, make sure you have the right tools and materials on hand.
For traditional sewing repairs, you'll need needles and thread. Replacement parts like eyes, noses, hands, and sound boxes can be found at craft stores or sewing centers.
And if your toy has fur, a soft brush will come in handy for fluffing it up after the repair.
However, if you're looking for a quick fix or aren't comfortable with sewing, a hot glue gun can be a great alternative. This no-sew method can be a lifesaver, especially for minor tears.
Just remember, while this method is quick and easy, it might not be as durable as sewing. (more on that later in the No-Sew Method section)

Temporary Fixes
If you're on the move and don't have access to a sewing kit or a glue gun, you can use a bandage or a piece of cloth to temporarily cover the tear.
This will prevent the stuffing from falling out until you can properly fix the toy.
Repairing Open Seams
One of the most common issues with stuffed animals and plushies is open seams.
But don't worry, mending these tears is easier than you might think. Here's a step-by-step guide:
- Thread your needle with a thread that matches the color of your toy.
- Start sewing from the inside of the toy to hide the knot.
- Use a ladder stitch (also known as an invisible stitch) to sew up the seam. This stitch will make your repair work almost invisible!
- Once you've finished sewing, tie off your thread on the inside of the toy and cut off any excess.
Remember, if your plushie is covered in fur, you'll want to be extra careful not to catch any of the fur in your stitches. A good tip is to use a pin to hold the fur out of the way while you sew.

Reattaching Detached Parts
So, your stuffed animal has lost an ear or a limb? Don't panic! Here's how you can sew it back on:
- Thread your needle with a thread that matches the color of your toy.
- Start sewing from the inside of the toy to hide the knot.
- Use a whip stitch to sew the detached part back onto the toy. This stitch is strong and will help ensure the part stays attached.
- Once you've finished sewing, tie off your thread on the inside of the toy and cut off any excess.
If you're dealing with smaller parts like stitched noses and mouths, or button eyes, you might need to use a different technique.
For these parts, you'll want to use a back stitch for noses and mouths, and a shank button sewing technique for button eyes.
Replacing a Sound Box
If your stuffed animal has lost its voice, don't worry! Replacing a sound box is a bit more complicated than sewing up a seam, but it's definitely doable. Here's how:
- Carefully open a seam on the back of the toy. Try to choose a seam that's already a bit loose, so you don't have to make a new cut.
- Remove the old sound box. Be careful not to pull too hard—you don't want to damage the speaker wire.
- Insert the new sound box. Make sure it's facing the right way so the sound comes out clearly.
- Sew up the seam using the ladder stitch.
Restoring Plumpness
Over time, your beloved plushies might lose their plumpness and become a bit flat. But don't worry, there's a simple solution to this problem: adding fresh stuffing. Here's how:
- Carefully open a seam on the back of the toy. Again, try to choose a seam that's already a bit loose.
- Remove some of the old stuffing. Be careful not to remove too much—you don't want your toy to lose its shape!
- Add fresh stuffing to the toy. Poly-fill works great for this.
- Use your fingers to distribute the stuffing evenly inside the toy.
- Sew up the seam using the ladder stitch.
Remember, the goal is to restore your toy's original shape, not to overstuff it.
So, add the stuffing little by little until you're happy with the result.

No-Sew Method
Like I mentioned before, the no-sewing method is an option, although not as effective.
All you need is a glue gun. Here's how:
- Apply hot glue along the edge of the tear on one side.
- Quickly press the two sides together and hold them until the glue dries.
- Be careful not to burn your fingers!
Be careful not to use this method if your child is still at an age where they put the plushie in their mouth.
And remember, for long-lasting repairs, sewing is usually the best option.

Caring for Plushies Post-Repair
Once you've repaired your stuffed animal, it's important to take care of it to prevent future damage.
Regular cleaning and proper storage can go a long way in maintaining the condition of your toy.
Conclusion
Repairing a stuffed animal doesn't have to be a daunting task.
With a few basic tools and a bit of patience, you can bring your child's favorite toy back to life.
And remember, whether you're sewing a limb back on or fixing a tear without sewing, the most important thing is to put love into your repair work. After all, these aren't just toys—they're cherished friends.
Before you go, don't forget to check out our adorable collection of plushies at Wakaii.
And if you want to stay updated on all things kawaii, subscribe to our newsletter. As a thank you, we'll give you 15% off your next purchase!
Got any questions? Please let us know in the comments below :)
FAQs
What are the common problems with stuffed toys?
Common problems with stuffed toys include detached parts like ears, noses, eyes, and limbs, open seams revealing the stuffing inside, failed sound boxes, and loss of plumpness over time.
What tools and materials do I need for stuffed toy repair?
For traditional sewing repairs, you'll need needles and thread. Replacement parts like eyes, noses, hands, and sound boxes can be found at craft stores or sewing centers. A soft brush will come in handy for fluffing up the fur after the repair. A hot glue gun can also be used for quick fixes.
How can I restore plumpness to a stuffed animal?
You can restore plumpness to a stuffed animal by adding fresh stuffing. Open a seam on the back of the toy, remove some of the old stuffing, add fresh stuffing, distribute it evenly inside the toy, and sew up the seam.